Quick Makeup Applications
Quick Makeup Applications
First off, you don't need to do a lot to feel & look good. You are beautiful without makeup on <3
But it's nice to have a simple quick makeup application routine that doesn’t take a lot of time. We’re parents, spouses, professionals, students and want a simple routine that makes us feel good and enhances our individual beauty. So let’s jump into an everyday makeup application that is fun, quick & easy and shouldn't take more than 10 minute from start to finish!
I've included instructions, and if you follow these steps in order from A to F, I guarantee a great result with your quick makeup applications. Fresh looking, long lasting, and without the need to touch it up. If you've ever looked for makeup to look younger, this quick makeup application is perfect for you.
The results also depend on the quality of the products. Talc in makeup and parabens in makeup are not good and will affect the results. You want to use mineral makeup that is talc and paraben free. It’s not easy, but possible to find ethical makeup brands that have affordable, clean makeup and use vegan cruelty free ingredients.
I'm also attaching links to these quick makeup applications as examples of what to look for in your makeup bag at home, specifically the sizes and shapes of what to use to get the best makeup results.
Products:
1. Moisturizer or Tinted Moisturizer
2. One Pressed Powder, one Powder Brush
3. Two Eyeshadows (one Medium, one Light), two Eyeshadow Brushes (One Small Round, one Medium).
Small round brush https://puzzlemakeup.com/collections/brushes-and-tools/products/round-small-eyeshadow-brush-1
Medium brush https://puzzlemakeup.com/collections/brushes-and-tools/products/medium-eyeshadow-brush
4.Mascara
Application:
A. Apply moisturizer all over your face and eyelids. Use only two fingers to apply so most of the Moisturizer goes on your face & not on your palm. If you use tinted moisturizer do everything the same but instead of using your finger, use a sponge. Tinted moisturizer is usually formulated to be thinner than foundation. To make the formula thicker but still look natural, you will need to use the thin side of the sponge. Apply from one side of the forehead to the other and repeat this makeup application all the way down to the chin. (The thinner makeup sponge side will make the formula thicker. The thicker makeup sponge side will make the formula thinner).
https://puzzlemakeup.com/collections/brushes-and-tools/products/wedge-sponge
B. Apply pressed powder all over your face and eyelids with a powder brush for long lasting clean application/results. Use the body of the brush not the head of the brush in soft strokes. Start from one side of the forehead to the other side of the forehead and repeat this makeup application all the way down to the chin.

C. Apply medium pressed eyeshadow with a medium brush only on the eyelid. Make sure that when you do your quick makeup application, while applying eyeshadow, you are always pulling softly on the temple. (Gently next to the outer corner of the eye.) This will make your eyelid more smooth/have less lines than just closing your eyelid, and will create a cleaner eye makeup application look. You want to start by applying your makeup in soft strokes from the outer corner of the eyelid to the inner corner of the eyelid. Doing so will make the outer corner of your eyelid a little bit darker than the inner corner, and will create more of a lifted look to your eyelid. This is what we all love and want. :)

You always want to use the body of the brush not the head of the brush every time to create a long lasting clean application/results. This is very important to get the right results with your quick makeup application and will save you a lot of time by not having to clean the mess that you create on your face each time that you do your quick makeup application.
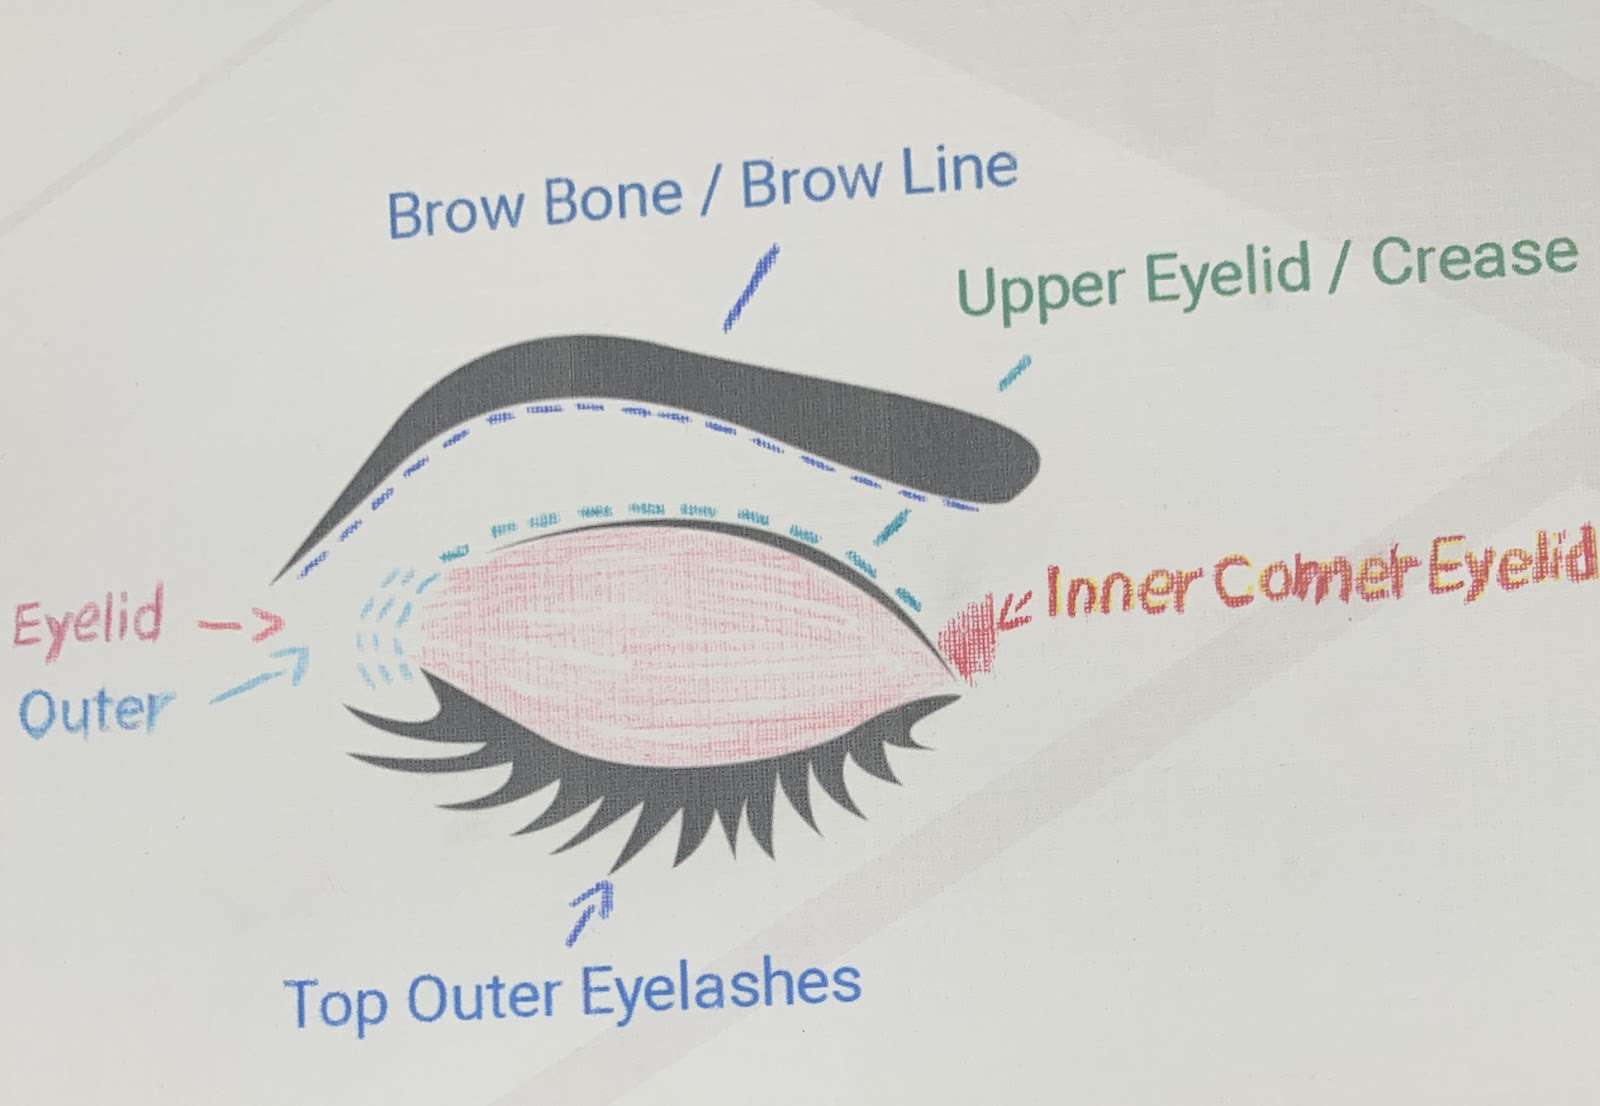
*at the end of the eyeshadow application (right after E.) you will have a full image description of the eye area to help with your eye makeup application.
D. Apply medium pressed eyeshadow with a small round brush on the crease. Because this eyeshadow brush is smaller, it will make the eyeshadow appear darker. (Smaller brushes concentrate the eyeshadow color, bigger brushes soften the eyeshadow color.) So you have now created two colors, similar but still different, with one eyeshadow.
Use the body of the brush not the head of the brush. Softly hold your temple and start your quick makeup application from the outer corner of your crease to the middle of the crease and blend. If you want your eye makeup application to look a little bit more dramatic, continue the line all the way to the inner corner of the eye crease. Don't forget to move your face at the correct angle so you can see where you're applying your makeup. It might seem unnecessary to mention, but with 20 years in the beauty industry, most of my clients never really moved their faces in the right way to see clearly where to apply their makeup properly.
E. Apply light eyeshadow with a medium brush following the brow line. Use the body of the Brush not the head of the Brush. Softly hold your temple and start your quick makeup application by simply flowing your brow bone/line. It's ok if this application goes a bit on your crease, it will soften the crease line and make everything look more blended without harsh lines between each color/eyeshadow.
*If you use loose eyeshadow instead of pressed eyeshadow, for best quick makeup application results please make sure that you use the body of the brush in soft dabbing movements when applied dry, but use soft strokes if the loose eyeshadow is being applied wet. Wetting loose eyeshadow will make the loose eyeshadow appear metallic and create more of a dramatic look.

*Quick Tip!
The only difference between eyeshadow and blush is the size and color, so if your medium eyeshadow is not too dark, go head and use a blush brush to apply.
For more help on how to use Brushes click This link
https://www.youtube.com/watch?v=KauECMhxhTE&t=38s
F. l love, love, love Mascara! Your makeup will never look the same without mascara! Before you apply your mascara, please make sure that when you open your mascara you are not pumping the brush - that dries out the mascara and ruins the consistency.
To me, mascara is one of the most important parts of our quick makeup applications and the reasons why are:
- Cleaning your lashes.
When you apply eyeshadow, some of the eyeshadow excess will fall on top of your inner lashes and make your lashes appear lighter. By applying the mascara you are cleaning the eyeshadow from your lashes and making them look darker.
- Making your lashes look longer and thicker.
You want to make sure that you apply your mascara from both sides of your lashes to give them the most definition. Start by applying your mascara on the top of the eye lashes when you brush them upwards. Don't be afraid to actually brush them from the beginning of the lashes right next to the roots all the way to the tip of your lashes. Especially if your lashes are really light like blond, red or light brown. Then you want to repeat this application on the top inner eye lashes.
This quick makeup application not only doubles your lash length and thickness, it triples your natural lash size and length. Use the head of the mascara brush and apply it going upwards only on the lashes in the outer corner of the eye to create a cat-eye lash look.
Bottom lashes in a dabbing motion, apply the mascara using the body of the brush on your bottom lashes.
- Curling your lashes
If you follow the previous makeup application steps. It's not only going to triple your natural lashes size and length, it will also curl your lashes without the need of using a lash curler. I don't believe in lash curlers as they can be really damaging to the lashes. I always follow these steps, so I never really had to use a lash curler to get the same results and keep my lashes healthy and happy.
*Quick Tip!
If you get a smudge of Mascara on your skin don't clean it right away, it's going to be a mess! Let it dry first and then use a dry q-tip or your finger and simply remove the smudge.
Mascara is also a great product to use as:
- Brow tint/definer: to give your eyebrows definition and make them look darker and fuller.
- Eyeliner: you can use a mini brush to apply the color from the Mascara brush to the mini brush, to the eye. also waterproof eyeliner hell yeah!
These Quick Makeup Applications and techniques are great for all ages! It's also very beneficial to use for a more mature makeup application. As we get older our skin loses its tightness, so if you want to use makeup to look younger, follow this technique step by step!
Thank You!